
So, welcome back.
A quick recap: in the last post, we ran through several steps in the lifecycle of a container: building it, running it, terminating it and then cleaning up afterwards.
Over the next few posts, we’re going to dig into the Dockerfile and the docker build command: what it’s used for, what does it consume and what does it create. It was originally going to be just one post, but as it turns out there’s quite a lot to talk about, so I’ve broken it up into bits.
In short, the docker build command takes a definition of what a container should look like and makes it reality. For example, I can outline the container image I want to use as a base, outline some commands to install or change something in the resulting container once it’s running, incorporate a set of files I want to be used in the container and set up some networking so it can talk to the outside world.
The container image typically includes some sort of operating system, such as Ubuntu Linux or Windows Server, and optionally a particular software package which can include database servers, web servers, application servers or even programming languages. Using an image that contains software already can be a big time saver, as it saves you having to install and configure the software yourself and allows you to get on with deploying your code.
Before we start looking at the docker build command, let’s discuss what it takes as an input: the Dockerfile, which is a set of instructions for building the container; and the context, which are the supporting files that relate to the container to be built (and can contain the Dockerfile). You can supply a file system path for the context but also a URL, which can point to a Git repository, a UNIX tarball or a text file. So as an example, you could write a Dockerfile to download a container image and configure it to host your application, then you can pull down your application files by specifying the URL of your application’s Git repo by storing the Dockerfile in the root of the repo and specifying the path in your docker build command.
- Create a folder in your project folder to hold the dockerfile plus a subdirectory for the app (in my example, I’ve called my project folder dockerblog1 and added an app subfolder to that)
- In the app subfolder, add a file or two (it doesn’t matter what they are for now; I’ve added a hello world HTML file in this example)
- In your root folder, create an empty file and name it Dockerfile
- In Dockerfile, copy and paste the following:
# Step 1: Specify the parent image for the new imageFROM ubuntu:latest# STEP 2: Configure work directoryWORKDIR /app# STEP 3: Copy website code to containerCOPY ./app/. .
- Run this to build the docker image (Note the trailing period to denote where to find the dockerfile):
DevMac:dockerblog1 kris$ docker build --tag dockerblog1:1.0 .docker build --tag dockerblog1:1.0 .[+] Building 0.8s (8/8) FINISHED => [internal] load build definition from Dockerfile 0.2s => => transferring dockerfile: 221B 0.1s => [internal] load .dockerignore 0.1s => => transferring context: 2B 0.0s => [internal] load metadata for docker.io/library/ubuntu:latest 0.0s => [1/3] FROM docker.io/library/ubuntu:latest 0.1s => [internal] load build context 0.2s => => transferring context: 94B 0.0s => [2/3] WORKDIR /app 0.1s => [3/3] COPY ./app/. . 0.1s => exporting to image 0.1s => => exporting layers 0.1s => => writing image sha256:8ae1666f2da888535d6d8dd61e50b388336a317698f7a6d66226b80ffa477a61 0.0s => => naming to docker.io/library/dockerblog1:1.0 0.0sUse 'docker scan' to run Snyk tests against images to find vulnerabilities and learn how to fix them
Let’s step back and unpack some of what we’ve just done. First, we’ve created a basic folder structure to hold our app, created a Dockerfile to define the container image, then created the container image and tagged it with the repository name (in this case dockerblog1) and the version of the application (in this case, the 1.0 after the colon).
You might ask what a repository refers to (or a tag for that matter). A repository is a set of images with the same name, but a different tag. A tag is basically an alias to a particular image, often used for versioning (for example, the latest tag commonly – but not always – points to the most recent release of a image). So as an example, here’s my list of local Docker images at the moment:
DevMac:dockerblog1 kris$ docker image lsREPOSITORY TAG IMAGE ID CREATED SIZEdockerblog1 1.0 8ae1666f2da8 6 days ago 72.9MBubuntu latest 9140108b62dc 9 months ago 72.9MB
If I then make a copy of helloworld.htm in the /app subfolder then run docker build –tag dockerblog1:1.1 .
DevMac:dockerblog1 kris$ docker build --tag dockerblog1:1.1 .[+] Building 0.5s (8/8) FINISHED => [internal] load build definition from Dockerfile 0.1s => => transferring dockerfile: 221B 0.0s => [internal] load .dockerignore 0.0s => => transferring context: 2B 0.0s => [internal] load metadata for docker.io/library/ubuntu:latest 0.0s => [1/3] FROM docker.io/library/ubuntu:latest 0.0s => [internal] load build context 0.1s => => transferring context: 136B 0.0s => CACHED [2/3] WORKDIR /app 0.0s => [3/3] COPY ./app/. . 0.1s => exporting to image 0.1s => => exporting layers 0.1s => => writing image sha256:e1f5b4b33253a8bb72528af79a73d503c46dd00ab77e3c55c407e53752fed2ae 0.0s => => naming to docker.io/library/dockerblog1:1.1 0.0sUse 'docker scan' to run Snyk tests against images to find vulnerabilities and learn how to fix them
Then run docker image ls again:
DevMac:dockerblog1 kris$ docker image lsREPOSITORY TAG IMAGE ID CREATED SIZEdockerblog1 1.1 e1f5b4b33253 34 seconds ago 72.9MBdockerblog1 1.0 8ae1666f2da8 6 days ago 72.9MBubuntu latest 9140108b62dc 9 months ago 72.9MB
You’ll see that there are now two dockerblog1 entries in the Repository column, but their tags are different (1.0 vs 1.1). The Image ID is also different, because I made a change to the files in the /app subfolder. As a further example, watch what happens when I add a tag to the newer dockerblog1 image:
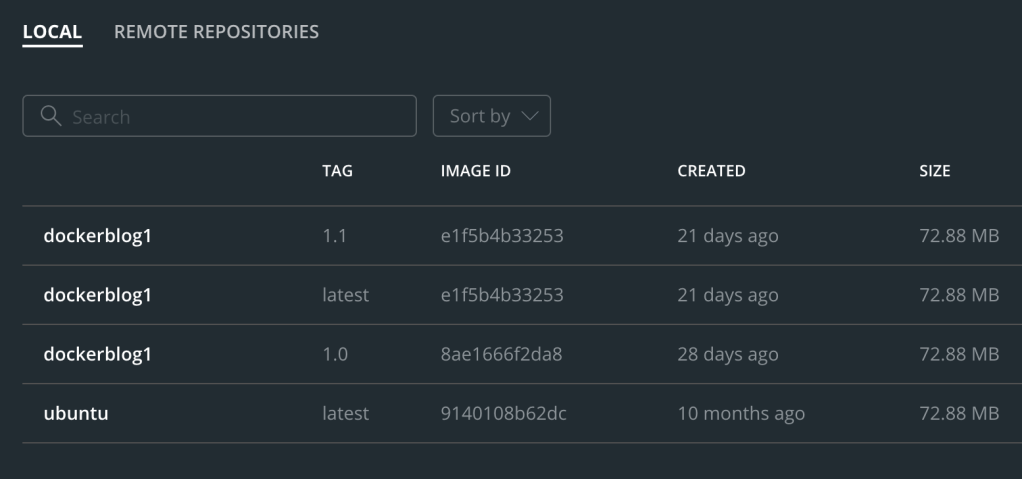
DevMac:dockerblog1 kris$ docker tag e1f5b4b33253 dockerblog1:latestDevMac:dockerblog1 kris$ docker image lsREPOSITORY TAG IMAGE ID CREATED SIZEdockerblog1 1.1 e1f5b4b33253 34 seconds ago 72.9MBdockerblog1 latest e1f5b4b33253 3 weeks ago 72.9MBdockerblog1 1.0 8ae1666f2da8 6 days ago 72.9MBubuntu latest 9140108b62dc 9 months ago 72.9MB
Now I’ve got three entries in the list for dockerblog1, all with different tags. dockerblog1 with the tag 1.1 and latest have the same Image ID, because I’ve not changed anything inside the image; I’ve just added an extra tag.
So, to summarise: we’ve written a basic Dockerfile and used it to create a container image. Then we made a change to some content that goes into the image and created a new image using the same Dockerfile. We also tagged the images, both using docker build and docker tag.
You can see how this can keep your environment fresh without configuration changes causing problems. For example, if I had a set of web servers hosting content, all I need to do to begin updating content is to create a new container image with the updated content but the same Dockerfile, then start adding them into my array of web servers while removing those with the old content. Conversely, I could also deploy a new configuration on my web server farm, referencing the same content source, to begin running a rolling upgrade of my farm.
Depending on how I did things, I might tag the new image, perhaps with latest, and use that as a way to specify what I want to deploy. As its all code-driven, I could quite easily do the deployment using an automated pipeline so that it deploys my updated environment triggered by pushing code into a Git repo. More on that in a future blog post..
Hopefully this is been a positive start for creating your own containers. In the next post, we’ll go though pulling information into a new container from a GitHub repo and delving deeper into options available to you in a Dockerfile. If you’ve been following along, feel free to comment on how you found it.
